How to Python: The Basics II
- jkundycki
- Nov 21, 2020
- 6 min read
Conditionals and Lists

Today, we will delve deeper into the basics of Python with the second part of my guide How to Python: The Basics. The original post can be found at the link found below:
We will start right from where we left off and build on the concepts used in the first lesson so if you are having any issues following this tutorial, be sure to go ahead and click on the link above for clarification.
In the examples, I will provide the code so you can copy and paste if you want to follow along that way and the code will be followed by an image of the code that was executed using Jupyter Notebook so you can see what should happen when you run the code.
Lesson
Conditionals In the last lesson, we saw in Data Types that one of the data types native to Python is a Boolean Value (bool) which is a True or False statement. When we talk about Conditionals, we are talking about code that does something based on a condition. To test a condition, we use Boolean Values to determine whether something is True or False. Let’s take a look at an example of this:
# The code below will ask a user for a number input, and will then tell the user whether the number is even or odd.
Variable1 = int(input('Give me a number '))
if (Variable1 % 2) == 0:
    print("The number is even")
else:
    print("The number is odd")
And here is what it should look like when you run it on your end:

Ok, let’s unpack the code snippet shown above. I decided to combine some elements from the first lesson to show you how the concepts can be used. So the first part is asking for a user input in the form of a number, nothing new here. Feel free to try it with different numbers to test the code.
The new part is the next line that starts with if. This is the conditional statement. This line is telling the computer to print that the number is even if given an even number and otherwise (else) it will print that the number is odd.
Something new that I also decided to show here is also how to tell if a number is even or odd. To do this in Python, we used the remainder operator %. In the example above, it is testing that the remainder (%) of the number entered by the user (Variable1) when divided by 2 (which is the 2 after the remainder operator) is 0 ( == 0). A double == sign is how to check that two expressions are equal in value.
It is also important to note, that in Python, a 1 is True and a 0 is equal to False. If there is a lack of information, Python will consider the “Truthiness” of the object to be false and if there is information it will be considered True. Let’s take a closer look with the bool() method:
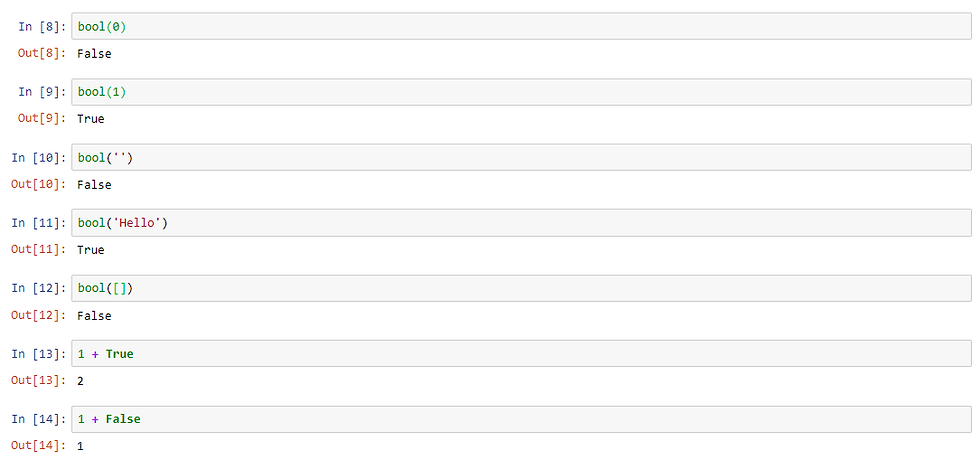
Feel free to mess with the bool() method and the True / False operators until you feel comfortable with the concept.
Let’s do one last example to wrap up conditionals:
days_off = 3
if days_off > 4:
    print("Woohoo! Vacation!!!")
elif days_off > 2:
    print("This is better than the weekend!")
else:
    print("I'm looking forward to some time off.")
And here is how it should look in the notebook when you run it:

In the example above, the part I really wanted to showcase is the else if statement (elif) which is another type of conditional that acts like a secondary if statement. In the case above, we could change the number of days_off and get different responses. If the number of days_off is more than 2 it will print “This is better than the weekend!” if there were more than 4 days off it would print “Woohoo! Vacation!!!” otherwise it would simply print “I’m looking forward to some time off”.
Lists
Lists are the first form of collection we will cover in the tutorial. When we talk about collections, what we mean is a method of grouping different pieces of data together. Let’s start by taking a look at a list of different pets in Python:

To initialize a list we use the open bracket [ and we end the list with a closing bracket ]. Within the list, there are different pieces which are called elements and each element is separated by a comma. In the example above, each element is a string that I denoted with the name of a pet species.
Usually, when working with lists, you’ll want to set the list as a variable which can be manipulated in different ways:
pets = ['Dogs','Cats','Birds','Mice','Lizards','Horses']Here is what happens in the notebook when we define our list as a variable and then run it:

Lists are their own data type in Python:

Accessing Elements
Okay, now let’s learn the different ways we can manipulate a list. Let’s start by selecting in element in the list. Let’s access the first element of our list, Dogs and then the second element, Cats:
pets[0]This should access Dogs from our list:

Let’s access Cats:

The way we access elements is by adding a bracket after the list variable and then putting the number which represents the element position in the list. This access to an element is called indexing. In many programming languages, the index starts at 0 rather than at 1. So, to access the first element you will need to index at 0, for the second element, it will then be 1 and so on…
This makes it simple to access the first elements of a list, but what if we had a really long list and we wanted to access elements from the other end? Let’s take a look.

Ok, we see to do this, we add a ‘-’ in the index at to access the last element, it will be 1. To continue incrementing the number, will move us from right to left in the list. Something that could be important to note, is that you can set indices from lists to variables:
last_of_my_list = pets[-1]
last_of_my_list
In the notebook:

Accessing multiple elements in the list is done through what is called a slice and is similar to accessing a single index, this will not change the original list:
pets[2:4]
The first index in the slice is where the slice will begin and the last index will stop at that number (that number will not be included, so it will include the index right before it). Let’s take a look at our lists from earlier just to verify:

We see that Birds is element 3 (or index 2) and the list stops at index 4 which is Lizards and is not included in what is printed above.
Changing Lists
Okay, let’s learn how we can change a list. There is a first obvious way which is usually less practical and that is by just setting the variable as a changed list.
pets = ['Dogs','Cats','Birds','Mice','Lizards','Horses','Pigs']
pets
We set our pets variable to be a list that includes Pigs. Oftentimes, this will not be the best way to change a list and there are much better methods to do so. Let’s first learn how to add an element to a list by adding Turtles to it. To add an element, we call upon the append() method:
pets.append('Turtles')
pets
Let’s now look at how to remove an element from a list. To do this we will use the pop() method. If no index is specified in the method, it will remove the last element of the list.
pets.pop()
pets.pop(3)
pets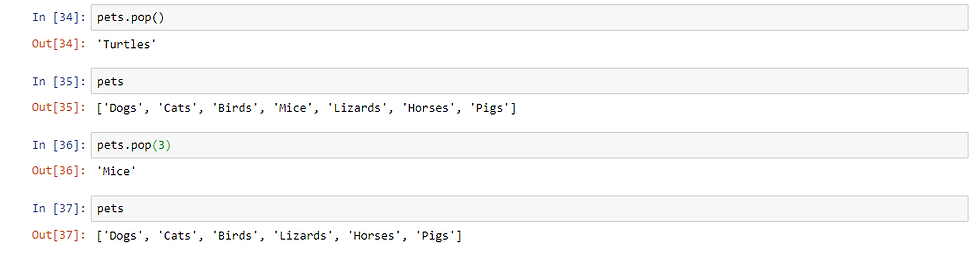
For the sake of the lesson, let’s add our Turtles and Mice back in to the pets list:
pets.append('Turtles')
pets.append('Mice')
pets
We can also change elements in the list, just like setting a variable:
pets[3] = 'Pigs'
pets
In the example above, we have change index 3, Lizards, to Pigs without removing the other element, Pigs from the list.
Alright, we’re almost done with the lesson. We now have a duplicate in our list, but there is a way to see the unique elements in a list with the set() method. The set() method will count each unique element once and make a list of them. We will set our unique list to a new variable as to not alter the first one. Also, it is important to note that a set is similar to a list, but has it’s own data type:
unique_pets = set(pets)
unique_pets
In the example above, unique_pets is the same as pets except it had one duplicate element, Pigs, which is how if differs from our list pets. Therefore, it should have one element less. Let’s check the length of both of these variables to make sure by using the len() method which gives us the number of elements in an object:

It is confirmed, the unique_pets has one less element than pets. Just as an additional note, the len() method will gather the length of the elements in whatever object you apply it to so if we are to try using it on a string, it will count the amount of characters for that string:

Parting Notes
That wraps it up for this lesson. I hope everything is clear and if you have any questions, feel free to comment down below and I will do my best to get back to you. I enjoyed making the tutorial and I hope you find in enjoyment in following it. Keep exploring, have fun and be creative doing it!


Comments